

Some links in this post are affiliate links where I will earn a small commission at no extra cost to you
They are all over your Reels and TikTok’s. Cattle panel arches are a perfect weekend DIY that can really add so much character to your garden space. We built ours a couple of summer’s back and they are by far my favourite feature in the garden because they are not only beautiful but oh so functional.
Summer of 2021 we decided that it was time to upgrade the garden from a basic in the ground garden to one with raised beds because gardening had become just as exciting for the kids as it was for me and they are not quite as good a dicerning whether or not something is a weed… if you catch my drift. So along with adding our 36 inch raised beds to keep the plants safe from little hands we also added two cattle panel arches to we could take full advantage of our space and do some vertical gardening.
Now let’s chat the process because this DIY is so easy and very budget friendly.
Materials and the How To
This is a list of supplies for a single arch, once you know how many you want to build adjust the list to meet your needs.
- 1 cattle panel
- 4 T posts
- so many zip ties
- A post driver/pounder or rubber mallet and block of wood.
Below you will find links to the step by step instructions for the project to make navigating easier:
- Step 1: Choosing How to Position the Arch
- Step 2: Install Raise garden beds
- Step 3: Pound in T posts
- Step 4: Attach Cattle Panel
- Step 5: Fill Garden Beds
- Step 6: Plant
Step 1: Choosing how to position your arch
When deciding where your arch is going it’s important to think about how it will be positioned in respect to the sun. Ideally your tunnel will go North-South this allows the plants to have either bright morning light from the East, and then filtered like through the afternoon and evening or vice versa. Having the tunnel run east west may seem like a good idea at first until the plants start to grow and you are in the northern hemisphere meaning the north side of the arch would quickly go without much sunlight.
step 2: Install Raised Garden Beds
If your garden beds are already installed you can skip to step 3
You may be tempted to put in the arches first and then build the beds but by building the raised beds first you can account for width of the walking path. You are going to want to have your beds between 3 and 4 feet apart. This will allow you to walk comfortably but also bend or kneel in the path in order to work in the beds.

Another point to consider is the width of your beds themselves. I recommend bed widths of 3 feet wide because they allow enough space to plant a climbing plants on the inside of the trellis garden arch while still allowing plenty of space to plant on the other side. This worked out wonderfully last year when I was able to plant my purple pole beans on the arched trellis and lettuces in the open space on the other side.
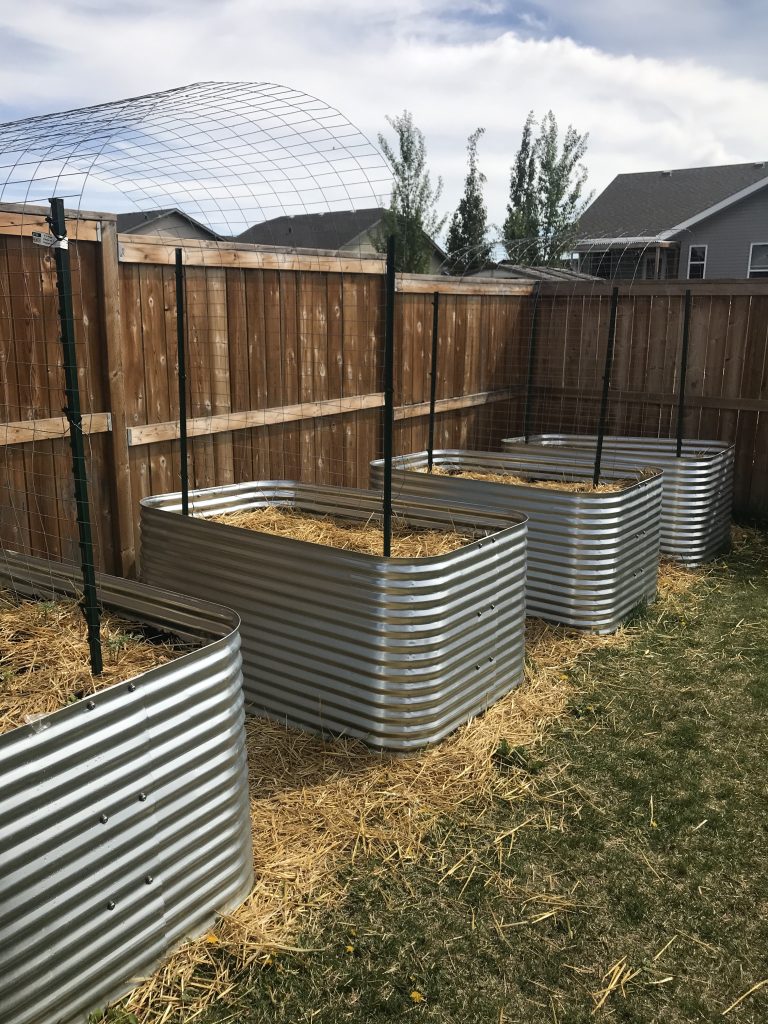
When choosing a raised garden bed there are so many options. Treated wood or cedar, steel or plastic. Each have their own benefits and drawbacks that you will need to consider when determining which will be best for your garden’s needs and budget. I chose galvanized steel beds from Raised Garden Beds and they are beautiful. They are very easy to assemble and still look amazing after two harsh Canadian winters.
Step 3: Set the T Posts
Once your garden beds are installed it’s time to set the T posts. To start measure the width of your cattle panel. This is the distance between the T posts.
Now for the heavy work. You will want to pound the T posts into the ground about 1 foot below the base of the garden bed. A post driver will make this job much easier but if you don’t have one a rubber mallet and block of wood will suffice.

You can see in the picture above that we filled the beds with straw before installing the T posts. Don’t be like us, this makes the job so much more difficult. It can be done so if you are adding the trellis to already established beds it will work but just know it’s much harder to pound the posts into the solid ground beneath the beds.
Step 4: Attach Cattle Panel
To start, stand the cattle panel on it side along the OUTSIDE of the arch and attach it to the T posts with zip ties. Once the panel is secure lift the other end up and over to the T-posts on the other side. This will create the top of the arch. Secure the panel to the OUTSIDE of the T-posts on the other side of the arch.

When attaching the panels you can choose to attach them flush to the ground or if your beds are raised quite a bit off the ground you can attache them closer to where the top of your soil will be allowing the top of the arch to be higher. This can create a more dramatic look.
Step 5: Fill the garden beds
Now it’s time to fill the garden beds with soil and compost. The fill will provide extra support by burying the T posts further and provide a nutrient ground for your plants to grow.
Step 6: Plant your garden
Choosing the plants to fill your garden bed is really where you can allow your creativity to flourish. From flowers to gourds that will each create their own unique visual interest, and the choices are endless.
Plants that grow well on the arches
After two full summers of planting on these trellises I have learned that the following plants to exceptionally well with vertical gardening and made elegant leaf filled arch trellises.
- Cucumbers
- Tomatoes
- Pole Beans
- Snap Peas
his last summer my plants of choice for garden arches were cucumbers, tomatoes and pole beans. These plants will grow to the top of the arch and sometimes loop back down again. The arch allows for easy harvesting, good air flow, the flowers are open and visible to pollinators while so much sunlight hits those leaves. They also fill the arches with beautiful leaves creating shady spots for the children to play under and harvest snacks throughout the day.

When choosing your plants, if you want an arch that will fill with little effort you will want to choose vegetables like beans, peas and cucumber or flowers like sweet peas, jasmine and clematis that climb. Once they are trained to the trellis they will do the rest of the work for you. I tend to encourage even distribution over the arch to discourage the plants from crowding each other that is not always necessary.

If you choose to use the trellis arch in place of a tomato cage you can use garden twine to loosely secure the main stem to the trellis, and gently weave the branches through the lattice of trellis. Tomatoes are much more hands on and require regular work to keep them safely woven through the trellis but my tomatoes have survived torential winds without dropping a single tomato or branch by using this method.
When choosing your tomatoes you will want indeterminate tomatoes because they will continue to grown vertically until they are no longer supported. Just imagine it… 7 foot tomato plants!
Make your own DIY garden arch trellis
Now that you know how easy it is to make a garden arch trellis from cattle panels you can easily create a beautiful garden space with lots of visual interest that is also functional. When you make your trellis be sure to come back and share your pictures and what you planted. I love seeing new garden spaces to draw inspiration from for the next year.


Meg
February 7, 2023 at 2:46 amI love cattle panel trellises! Yours turned out so pretty! I love how they convert the areas in between the beds into growing space!